Sunday, November 25, 2012

Cuddly Baby Cocoons


When Adalyn was a baby, she was a HUGE fan of the swaddle.  Like she screamed her head off constantly for the first 4 months unless she was wrapped up super tight....We almost felt like we were putting her in a straight jacket - and my Mom hated it - but it was the ONLY way that we could get her to calm down!  So for little Annie I wanted to be prepared!  With her being a January baby, I figured it would be good to have some warm swaddles.  She can sleep in them and lounge around the house in them (and we won't have to worry about her tiny feet being covered by a blanket!)

Anyway, I CANNOT WAIT to have a baby to put these on....And I secretly want an adult sized on for myself. I sort of made up the pattern as I went along, but did my best to write it down when I was done, so here it is!

Cuddly Baby Cocoon (pink):

I used a medium weight baby yarn (4) and size J hook

Ch: Chain
Sl St: Slip Stitch
TC: Triple Crochet
SC: Single Crochet
TC CC: Triple Crochet Criss Cross


Round 1: Magic Ring, Ch4, TC16 into Magic Ring, Join top of Ch 4 w/Sl St (16 TC)

Round 2: Ch 4, 2 TC in each stitch, Join top of Ch 4 w/Sl St (32 TC)

Round 3: Ch 4, 2 TC in first stitch, TC in next stitch, repeat for rest of round, Join top of Ch 4 w/Sl St (48 TC)

Round 4: Ch 4, 2 TC in first stitch, TC in next 3 stitches, repeat for rest of round, Join top of Ch 4 w/ St St (60 TC)

Rounds 5-13: Ch 4, TC in each stitch, Join top of Ch 4 w/Sl St (60 TC)

Round 14: Ch 4, TC in first stitch, TC CC over next 2 stitches, repeat for rest of round, Join top of Ch 4 w/Sl St (20 sets of TC, TC CC)

Round 15: Ch 4, TC in each stitch, Join top of Ch 4 w/Sl St (60 TC)

Round 16: Repeat Round 14

Round 17: Ch 4, TC in each stitch, Join top of Ch 4 w/Sl St (60 TC)

Rounds 18-21: Ch 1, SC in each stitch, Join Ch 1 w/Sl St (60 SC)

Weave in the ends and you are DONE! :)  I used a tapestry needle to put some elastic thread in the top row of SC to sinch it up at the top.

For the mint one I followed almost the same pattern, except that starting in Round 2 I used a row of double crochets and a row of single crochets to replace the triple crochet for a tighter look.  I did the increases in the row of double crochets then did a row of single crochets in each st.  For example: Round 2 was Ch 3, 2 Double Crochet in each stitch, Join w/Sl St, Ch 1, Single Crochet in each Double Crochet stitch, Join w/Sl St. So you would have a row with 32 Double Crochets and a row with 32 Single Crochets.  I also only did one Row of the Criss Cross using a Triple Crochet Criss Cross in Round 16 and I did not do the TC between each TC CC. So for Round 16 I started with Ch 4, then did 30 TC CC.  For Round 17 I went back to the row of DC, row of SC.  Then in round 18 I did the row of Double Crochet, but did not join the beginning Ch 3 for the row; instead on the last stitch I Ch 1, did a SC decrease, SC in each stitch around then a SC decrease in last 2 stitches.  I repeated that with the next however many rows to form the V.  For the ruffle, I  just doubled the stitches for 2 rows (1 SC row, and 1 DC row).

And for the purple, I'm sorry to say that I REALLY made this one up as I went along and have no idea what I did for a couple parts! SORRY! :)

But on the bright side, if you need some help with any of the stitches, you can check out This video for Single Crochet and Double Crochet or This one for the Triple Crochet and Triple Crochet Criss Cross!


Happy Crocheting!
 
Basic Crochet Stitches Tutorial
 
Triple Crochet and Triple Crochet Criss Cross Tutorial


Wednesday, November 14, 2012

Baby Crib Bumper

It feels so good to be back and sewing again! While we were way out west I did NOTHING.  I think it was the distance from Ali that just made it not seem right....That and we found out we ARE EXPECTING OUR SECOND BABY right after we moved.  Me and the first trimester ( ok, who are we kidding, the whole first half) of pregnancy do not get along.  Anyway, Ali and I have been reunited and I am about to hit 30 WEEKS (3/4 baked people),  so I figured we better start getting ready for this little girl we have coming in January!  In the last month since we have moved, I have made 3 baby blankets (for other people), Adalyn's Halloween Costume - she was the cutest Minnie mouse ever, a few hats, a dress, a newborn cocoon (tutorial coming soon) AND THE MOST BEAUTIFUL CRIB BUMPER for our little Annie Lee's crib!  Yes, I've been busy...and adjusting to my new life as a stay at home Mom!
 

First, excuse the picture quality - we are planning to invest in a new camera for Christmas, but for now its the good 'ole iPhone (except when Ali is around and I get to use her fancy camera!)  Secondly, excuse the face that there is no mattress....We are waiting to move Adalyn into a big girl bed and then we'll steal hers! :)  Anyway - Isn't it a beauty?!  You should really check out the video tutorial to see how I did it!

Here are a few notes to go with the video:

1. Supply list: 
  • Fabric for front and back of the bumper: 2 - 12" X 27" pieces for the front and 2 for the back. 
  • Fabric for a ruffle.  I used a eyelet lace for mine, but you could easily make your own ruffle out of fabric. You will need 4.5 yards of ruffle
  • Fabric for the ties: 32 - 2.5" X 15" pieces.  I used two different fabrics so I had 16 of each.
  • Stuffing to fill it with
2.  In the video I made a mistake with the number of ties. At the beginning I saw 12, but you will really need 16 (4 in each of the 4 corners of the crib = 16...I do not have a brain these days and cannot count.)

3.  There will be a matching crib skirt and probably a couple of other things for little Annie's nursery coming soon, so come back and see us! :)


Wednesday, October 31, 2012

Pirate Boot Covers


BOOT COVERS... fit for a pirate!

First draw your design with newspaper to make your pattern.


Cut out your fabric (I used a dark faux leather) and hem the free ends.


Attach them to your boots with safety pins and mark where they need to be pinned to line up. 


Add a decorative cinch for detail.


Add trim to the border.


I added this little strap over my cinched fabric and embellished with a button.


Ta da!With a little ribbon to tie in the back, I've created removable boot covers.


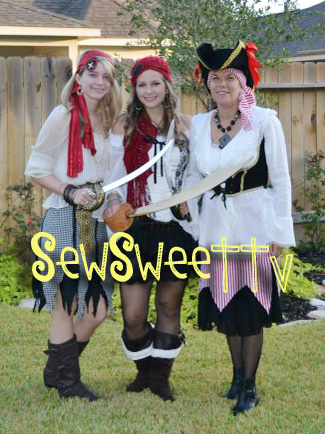
A couple of us girls sporting our pirate duds!


Paper Mache parrot?

Yes... a homemade parrot - blue and gold macaw that is, and his name is Darwin.

Start with a skeleton of paper and chicken wire...


Bust out your elementary school paper mache skills - flour + water is classic. I looked up so many recipes for "new and improved" paper mache, but at the end of the day, thin even coats worked well. Allow form to dry between layers!


Paint a solid white....


then get creative! I painted all my colors first then hot glued feathers and beady eyes (found at Hob Lob)... I even made an eye patch for the little man.


How does he stay on your shoulder? We made a saddle out of leather that allows him to sit on your shoulder...


Darwin even met a distant relative at Ren Fest!


Sew.Sweet.


Trick O'Treat!!

A fun little sign we made for the house... 

One side says, "Trick O' Treaters... Welcome!"


and at the end of treat bowl "Out of Candy... Sorry!"

haha. The kiddos were so cute this year.

Sew.Sweet.

Friday, October 26, 2012

HALLOWEEN!

It's the time of year to dress up and celebrate Halloween. We were at our local Renaissance Festival and the weekend was pirate themed. So we just had to make our own props!

This go 'round I made my date a pirate vest and paper mache parrot. For me, I added large pirate cuffs to a pair of slouchy boots I already had... and the crown gems: our homemade pirate swords.

Stay tuned for each of the mini projects!

Sew. Sweet.

Thursday, October 4, 2012

It's been HOW long??

Oh my. Last post in February?

Where did the time go?

Well.. Meredith moved out west and Ali went back home for a job... distance and new commitments forced our blogging to be put on hold...

 BUT the two ladies of SewSweet are about to be REUNITED! 
We are so excited because THIS WEEKEND we will be together again...

Stay tuned... We've been saving up projects to share!

Sew.Sweet.

Friday, February 17, 2012

FLY cookies??? Yep.


So what's the story?

CAUTION: Not for weak stomachs!!
 I'm a veterinary student and we are doing a group presentation about Habronemeiasis (a skin infection by worms) and to spice things up a bit, I thought we could have some treats that reflect the very important part of this disease process:
 FLY CONTROL!

Here's a basic diagram (thanks to Merial) for those remotely interested:
I started with a cheap butterfly cookie cutter...


Flipped that little guy right side over, adjusted the wing angle and added a little fly bottom between the wings.


Once baked, I made some brown icing (not chocolate!) and outlined the body and eyes of the fly. While still wet, I sprinkled some chocolate sprinkles for texture...


Once my outline dried, I could fill in with a darker brown icing and drew my little wings!


Sew. Sweet.


Wednesday, February 15, 2012

Love is Sweet!

So since Valentine's Day was smack in the middle of the week, the beau and I get to celebrate twice! (that's our rationalization). 

In prep for his arrival this weekend,
 I made him a sweet valentine that's edible... 

...while I was making some fly cookies for a presentation at school. 
Yes. I said fly, as in house fly, but don't worry I'll explain later....


Just had a little bit of dough left to work with..

But it came together with some icing.
Now, if only I can wait until he gets here...


Sew. Sweet.

Monday, February 13, 2012

The lacy strips afghan!

As a beginner at crochet, I'm constantly looking for easy patterns that I will enjoy... Here's one that I tried from Lion Brand Yarn's website: http://www.lionbrand.com/patterns/L0374.html?noImages=&r=1 It's a free pattern but you will need to make a free account to access all their patterns (so worth it!)

Here's the original by Lion Brand. They used wool-ease thick and quick but I chose to do it with Loops  & Threads "Cozy Wool" because its a 50/50 acrylic/wool mix and is softer!

Here's my final product:


Happy crocheting... 
Sew. Sweet.


Saturday, February 4, 2012

Travel Jewelry Pouch

Ever pack up your jewelry when you are traveling only to get to your destination and have a giant mess of stuff to untangle or an earring you can't find?  I HAVE!  But never again!  This little pouch is the perfect way to keep your jewelry nice and organized (and in one place) when are traveling.  Its a super quick and easy project and would make a great gift! 


Please excuse the subpar photography skills...I DO NOT have Ali's talent with the camera.  That and my camera totally blows which doesn't help my lack of skill...

Quick Note:  I accidentally forgot to hit record for a small part of it...so annoying.  Anyway, after the first part and sketching your lines onto the small circles you will put the small circles right sides together ans stitch around the outside.  Be sure to leave a small gap so that you can turn it right side out.  And before turning it to the right side, you may want to cut some slits in the seam allowance so that it will lay right once you flip it.  Sorry bout that!  Anyway - Enjoy! :)

Friday, January 27, 2012

Sweet Ruffle Tote

So one Sunday afternoon that Ali and I got together to sew I decided that my Addy Bug needed a new daycare bag.  And so we have the SewSweet version of the ruffle tote bag.  I'm pretty excited about the way it turned out...I mean, just look at all that ruffley goodness!!


Check out the How To!  And I hope you'll stop by next week for our FIRST GIVE AWAY!!

Enjoy!

Friday, January 20, 2012

Lion WashCloth Puppet

Hey y'all!! It's bath time :) Little Addy was our quality control expert on this little project... A lion wash cloth puppet!
How fun! 
 

Here's the pre-bath final product:


 So how do you get started? Here are the pieces that you'll need...

And a pattern just for you! We took all the science out of it. Now you can just get to sewing. Be sure to check out our video :)

Saturday, January 14, 2012

Furry Fleeceband How To!

It feels so good to back  :) After a long break... We are ready to hit the craft room. One of my "better late than never" Christmas presents was a fleeceband for my dear friend who moved up the northeast.... (too cold for this Texas girl).

Here's a simple little project for 30 minutes or less...

What you need:
Two coordinating fleece fabrics
Faux fur

Let's get started! Fold your first piece of fleece fabric so that you have 11" in the stretchy direction. (You'll notice that one way the fabric is stretchy, and the other way it's not...) Cut out a rectangle that's 11" x 5" and then trim away the bottom edge to make a curve for your ears. The part where the fold is where your forehead is... so you don't want it too thick!


Cut out a coordinating piece of fleece 

(remember the stretch in the long direction!)


Open up your lining fleece and sew on two furry ear patches. I just laid my fleece over the fur and estimated. It's the inside... so no one will really see the details. Stitch the fur to the fleece right near the edge.


 NOTE: Fur is very difficult to sew "against the hair" so you may need to sew this piece on with two directions of stitches.


I happened to have access to an embroidery machine, but this isn't necessary! I did add a little strip of coordinating fleece to the front and attached it with a zig-zag stitch. The beautiful thing about fleece is that you don't really need to worry about the unfinished edge!


Now, put the right sides together and stitch a seam at the top and bottom of the fleece band, leaving the ends open.


Turn that baby inside out!


I pinned the edges flat so I could evenly put the finishing stitch
(1/4" from the edge) on the top and bottom. 


Now, with the lining out, pin the edges to see how it fits... Take a little more or a little less so it fits just right. Then do a couple reinforcing stitches and trim the excess fabric, leaving about 1/2" selvage.


Using your zig zag stitch, sew the edges of the selvage to give it a little extra stability and a finished look.


With a straight stitch, I secured down the edges by sewing along the seam
I had already created.


There you have it! A sweet, furry fleece band in no time!
Stay warm!


Sew. Sweet.