Friday, February 17, 2012

FLY cookies??? Yep.


So what's the story?

CAUTION: Not for weak stomachs!!
 I'm a veterinary student and we are doing a group presentation about Habronemeiasis (a skin infection by worms) and to spice things up a bit, I thought we could have some treats that reflect the very important part of this disease process:
 FLY CONTROL!

Here's a basic diagram (thanks to Merial) for those remotely interested:
I started with a cheap butterfly cookie cutter...


Flipped that little guy right side over, adjusted the wing angle and added a little fly bottom between the wings.


Once baked, I made some brown icing (not chocolate!) and outlined the body and eyes of the fly. While still wet, I sprinkled some chocolate sprinkles for texture...


Once my outline dried, I could fill in with a darker brown icing and drew my little wings!


Sew. Sweet.


Wednesday, February 15, 2012

Love is Sweet!

So since Valentine's Day was smack in the middle of the week, the beau and I get to celebrate twice! (that's our rationalization). 

In prep for his arrival this weekend,
 I made him a sweet valentine that's edible... 

...while I was making some fly cookies for a presentation at school. 
Yes. I said fly, as in house fly, but don't worry I'll explain later....


Just had a little bit of dough left to work with..

But it came together with some icing.
Now, if only I can wait until he gets here...


Sew. Sweet.

Monday, February 13, 2012

The lacy strips afghan!

As a beginner at crochet, I'm constantly looking for easy patterns that I will enjoy... Here's one that I tried from Lion Brand Yarn's website: http://www.lionbrand.com/patterns/L0374.html?noImages=&r=1 It's a free pattern but you will need to make a free account to access all their patterns (so worth it!)

Here's the original by Lion Brand. They used wool-ease thick and quick but I chose to do it with Loops  & Threads "Cozy Wool" because its a 50/50 acrylic/wool mix and is softer!

Here's my final product:


Happy crocheting... 
Sew. Sweet.


Saturday, February 4, 2012

Travel Jewelry Pouch

Ever pack up your jewelry when you are traveling only to get to your destination and have a giant mess of stuff to untangle or an earring you can't find?  I HAVE!  But never again!  This little pouch is the perfect way to keep your jewelry nice and organized (and in one place) when are traveling.  Its a super quick and easy project and would make a great gift! 


Please excuse the subpar photography skills...I DO NOT have Ali's talent with the camera.  That and my camera totally blows which doesn't help my lack of skill...

Quick Note:  I accidentally forgot to hit record for a small part of it...so annoying.  Anyway, after the first part and sketching your lines onto the small circles you will put the small circles right sides together ans stitch around the outside.  Be sure to leave a small gap so that you can turn it right side out.  And before turning it to the right side, you may want to cut some slits in the seam allowance so that it will lay right once you flip it.  Sorry bout that!  Anyway - Enjoy! :)

Friday, January 27, 2012

Sweet Ruffle Tote

So one Sunday afternoon that Ali and I got together to sew I decided that my Addy Bug needed a new daycare bag.  And so we have the SewSweet version of the ruffle tote bag.  I'm pretty excited about the way it turned out...I mean, just look at all that ruffley goodness!!


Check out the How To!  And I hope you'll stop by next week for our FIRST GIVE AWAY!!

Enjoy!

Friday, January 20, 2012

Lion WashCloth Puppet

Hey y'all!! It's bath time :) Little Addy was our quality control expert on this little project... A lion wash cloth puppet!
How fun! 
 

Here's the pre-bath final product:


 So how do you get started? Here are the pieces that you'll need...

And a pattern just for you! We took all the science out of it. Now you can just get to sewing. Be sure to check out our video :)

Saturday, January 14, 2012

Furry Fleeceband How To!

It feels so good to back  :) After a long break... We are ready to hit the craft room. One of my "better late than never" Christmas presents was a fleeceband for my dear friend who moved up the northeast.... (too cold for this Texas girl).

Here's a simple little project for 30 minutes or less...

What you need:
Two coordinating fleece fabrics
Faux fur

Let's get started! Fold your first piece of fleece fabric so that you have 11" in the stretchy direction. (You'll notice that one way the fabric is stretchy, and the other way it's not...) Cut out a rectangle that's 11" x 5" and then trim away the bottom edge to make a curve for your ears. The part where the fold is where your forehead is... so you don't want it too thick!


Cut out a coordinating piece of fleece 

(remember the stretch in the long direction!)


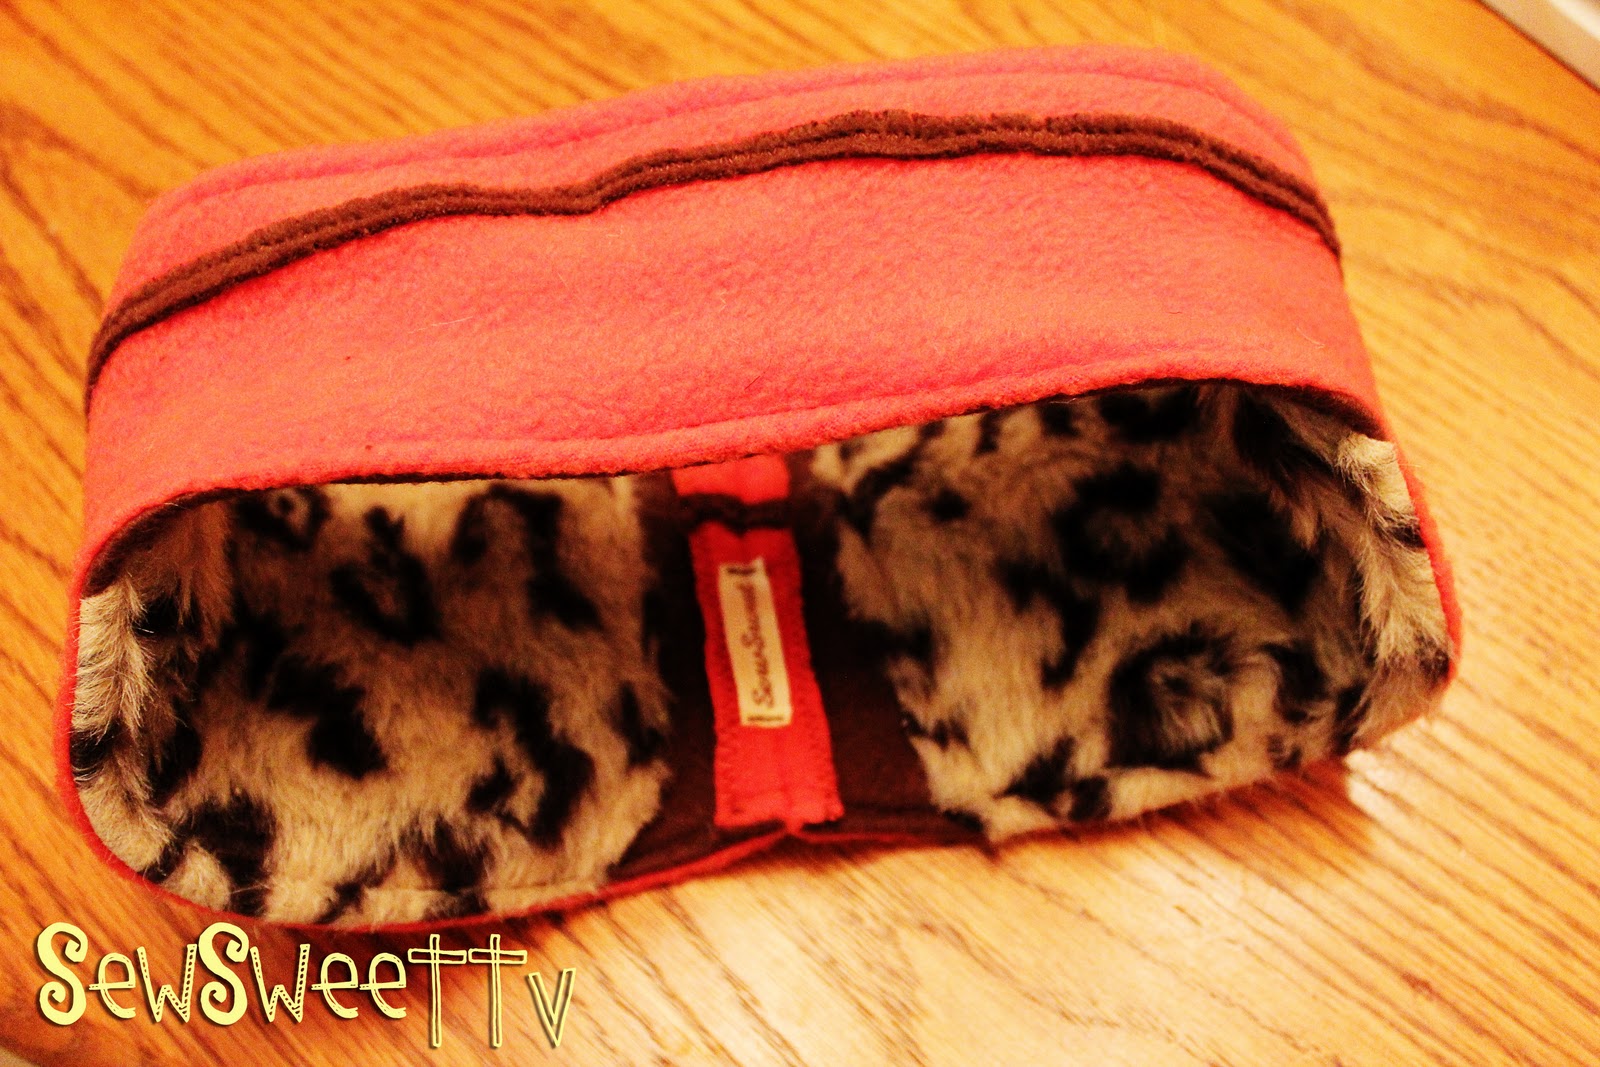
Open up your lining fleece and sew on two furry ear patches. I just laid my fleece over the fur and estimated. It's the inside... so no one will really see the details. Stitch the fur to the fleece right near the edge.


 NOTE: Fur is very difficult to sew "against the hair" so you may need to sew this piece on with two directions of stitches.


I happened to have access to an embroidery machine, but this isn't necessary! I did add a little strip of coordinating fleece to the front and attached it with a zig-zag stitch. The beautiful thing about fleece is that you don't really need to worry about the unfinished edge!


Now, put the right sides together and stitch a seam at the top and bottom of the fleece band, leaving the ends open.


Turn that baby inside out!


I pinned the edges flat so I could evenly put the finishing stitch
(1/4" from the edge) on the top and bottom. 


Now, with the lining out, pin the edges to see how it fits... Take a little more or a little less so it fits just right. Then do a couple reinforcing stitches and trim the excess fabric, leaving about 1/2" selvage.


Using your zig zag stitch, sew the edges of the selvage to give it a little extra stability and a finished look.


With a straight stitch, I secured down the edges by sewing along the seam
I had already created.


There you have it! A sweet, furry fleece band in no time!
Stay warm!


Sew. Sweet.