Showing posts with label 30 Minutes or Less. Show all posts

Saturday, February 4, 2012

Travel Jewelry Pouch

Ever pack up your jewelry when you are traveling only to get to your destination and have a giant mess of stuff to untangle or an earring you can't find?  I HAVE!  But never again!  This little pouch is the perfect way to keep your jewelry nice and organized (and in one place) when are traveling.  Its a super quick and easy project and would make a great gift! 


Please excuse the subpar photography skills...I DO NOT have Ali's talent with the camera.  That and my camera totally blows which doesn't help my lack of skill...

Quick Note:  I accidentally forgot to hit record for a small part of it...so annoying.  Anyway, after the first part and sketching your lines onto the small circles you will put the small circles right sides together ans stitch around the outside.  Be sure to leave a small gap so that you can turn it right side out.  And before turning it to the right side, you may want to cut some slits in the seam allowance so that it will lay right once you flip it.  Sorry bout that!  Anyway - Enjoy! :)

Saturday, January 14, 2012

Furry Fleeceband How To!

It feels so good to back  :) After a long break... We are ready to hit the craft room. One of my "better late than never" Christmas presents was a fleeceband for my dear friend who moved up the northeast.... (too cold for this Texas girl).

Here's a simple little project for 30 minutes or less...

What you need:
Two coordinating fleece fabrics
Faux fur

Let's get started! Fold your first piece of fleece fabric so that you have 11" in the stretchy direction. (You'll notice that one way the fabric is stretchy, and the other way it's not...) Cut out a rectangle that's 11" x 5" and then trim away the bottom edge to make a curve for your ears. The part where the fold is where your forehead is... so you don't want it too thick!


Cut out a coordinating piece of fleece 

(remember the stretch in the long direction!)


Open up your lining fleece and sew on two furry ear patches. I just laid my fleece over the fur and estimated. It's the inside... so no one will really see the details. Stitch the fur to the fleece right near the edge.


 NOTE: Fur is very difficult to sew "against the hair" so you may need to sew this piece on with two directions of stitches.


I happened to have access to an embroidery machine, but this isn't necessary! I did add a little strip of coordinating fleece to the front and attached it with a zig-zag stitch. The beautiful thing about fleece is that you don't really need to worry about the unfinished edge!


Now, put the right sides together and stitch a seam at the top and bottom of the fleece band, leaving the ends open.


Turn that baby inside out!


I pinned the edges flat so I could evenly put the finishing stitch
(1/4" from the edge) on the top and bottom. 


Now, with the lining out, pin the edges to see how it fits... Take a little more or a little less so it fits just right. Then do a couple reinforcing stitches and trim the excess fabric, leaving about 1/2" selvage.


Using your zig zag stitch, sew the edges of the selvage to give it a little extra stability and a finished look.


With a straight stitch, I secured down the edges by sewing along the seam
I had already created.


There you have it! A sweet, furry fleece band in no time!
Stay warm!


Sew. Sweet.

Thursday, September 22, 2011

Quilted Sunglass Case

So, I'm notorious for scratching up my really cheap pair of sunglasses... so this project was out of necessity.  I used to have a super cute Vera Bradley sunglass case, but it has since gone missing, so here's a how to on my version.

Check out the Video Tutorital!

You will need:
two coordinating fabrics and cotton/polyester batting
(bias tape optional)

Cut out a peanut shape pattern (I used the exact same pattern from the Sleep Mask Tutorial). You will need 2 pairs of each cut out and layer them lining (right side down), batting, and outer fabric (right side up).


Quilt your pieces together using your favorite stitch.


Using store bought bias tape (or make your own with 1.5" fabric strips). Pin a 6" strip to one end of the quilted piece, hiding all exposed edges. Add your bias tape to the second quilted piece, but on the opposite side (a mirror image). 


Sew close to the edge of the bias tape.


Now, stack your two pieces with the outer fabrics together. You will make a reinforced stitch across the bias tape. Then continue your stitch around the edge of the case with about 1/4" seam allowance leaving the end of the case with the bias tape open .


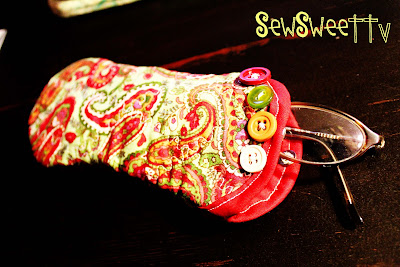
Flip right side out... and ta da! I wanted to make a little closure with a metal snap on the inside and embellish with a few buttons....


Here's my finished product! It fits my smaller profile sunglasses and my everyday glasses... No more scratches for this girl.


Sew. Sweet.

Saturday, September 17, 2011

Your Fur Babies Need A Bed Too!!

The pups are a part of our family in every way..They need a bed too!!


 This is Dozer Man. (Aka The Doze)
 This is Kimber Baby (Lovingly know as The Freak)
Last night these two (actually, it was probably just one of them..not naming any names...cough THE FREAK cough..) tore up their bed.  Well, kinda.  It was already in pretty bad shape.  The zipper was broken and the bag of stuffing on the inside was coming out and it pretty much just looked disgusting. I actually thought about taking before and after pictures, but I didn't because I was too ashamed.  But this morning we got up and there were pieces of cotton ALL. OVER. THE. LIVING ROOM!  She tore a hole in the bag of stuffing and well, what could be more fun than tons of cotton, right?! 
I have had a new bed for them on the to-do list for quite a while now.  I guess she just got tired of me putting it off and making stuff for the baby girl instead.  Well, congratulations Kimber Baby...YOU WIN!  Here's a video tutorial for an EXTRA large dog bed!  The Doze (65 lbs)and Kimber Baby (85 lbs) share this bed (they didn't want their own).  You can modify the measurements to whatever suite your Fur Baby though!

Enjoy!

Wednesday, September 14, 2011

Ninja gear!

So a very dear friend of mine has recently decided to start ninja training and I thought it was only appropriate that he had his own ninja headband. This how-to probably only will appeal to a small audience, but it could definitely be a fun costume for Halloween (which is only 47 days away... but who's counting?)

You will need three coordinating fabrics- I found the sweet Asian writing print at Hobby Lobby... I estimated the size of his head to be about 24" around,  so my pieces are as follows:

Asian print: (2) 3.5" x 24" and (2) 3.5" x 24" pieces

Red fabric: (2) 3.5" x 24" pieces

Gold satin: (2) 1"x24" pieces

*NOTE* I embroidered his ninja name on a red block, but you could do iron-on letters if you don't have access to an embroidery machine.


Next, I pieced the front together (red strip, Asian strip, red strip) and the back which was three Asian strips together. Put right sides together at the ends and sew a straight stitch along the edge.


Next, I took the gold satin and folded over the very end about 1/4", pinned and pressed to make a crease.  The edge was sewn with a straight stitch. Then the entire strip was folded in half length wise and pressed to make a crease. 


Now, layer the front and back pieces right side together and pin. I wanted the center piece to have a bit more detail, so I added the gold strip by matching up the unfinished edges of the front piece, satin and back piece. Pin in place.


Starting at one end, sew all around the edges, leaving a small gap to flip your bandana right side out. I ended up using a 3/4" seam allowance for the two end pieces so that the bandana would tie easier with less fabric. (the excess fabric was trimmed off)

When I got to the corners, I tapered the ends of the bandana to a point for added detail.


Once flipped right side out, check to be sure that all your seams are complete. Then, complete your last seam by folding over the unfinished opening to match the other side. Sew all around the edge to give it a finished look.


Here it is all put together!


Sew. Sweet.

Tuesday, September 13, 2011

Got hot curling irons?


I know every travelling girl has hot irons to tote back and forth and sometimes your curls are the last thing you do before you run out of the house. So there goes the hot iron right into the bag to inevitably melt or burn something important. The few of us that are prepared with a sock try that method.... but here's a sweet solution:
the curling iron tote! (this one holds a CHI and a 1" curling iron!)


Check out the video tutorial here:
2-in-1 Flat Iron/Curling Iron Tote

You will need two coordinating fabrics and cotton batting. Here are my measurements: outer fabric and batting (7"x22"), lining (7"x24"), and ties (3"x11")
 but they are pictured folded in half.


Layer your fabric with the right side of the outer fabric up, then cotton batting and right side of lining fabric down. Center the three pieces so that the lining sticks out about 1" on either side of the outer fabric. Pin in place.


Starting at the junction of the outer fabric and the lining, quilt the three pieces together. I made a diagonal checkerboard pattern with a curvy stitch.


Be sure to stop before you get to the lining on the other end of the piece.


Take the excess lining and fold over 1/2" and then another 1/2" on itself to make a finished edge. Pin in place.


Sew along the second fold, close to the outer fabric. Repeat for the other end.


Now for the straps... First take two pieces and lay the right sides together and pin. Then, one corner is folded over to make a triangle and that piece is cut off.  Flip the straps right side out and iron the straps so they lay flat. Sew along the edge for a finished look. Now, attach the straps

Now flip your piece with the lining side up and fold in half. The two long edges should be sewn about 1/2" from the edge. Clean up the excess fabric and thread to make it easier to flip right side out.


Turn your tote right side out and double check that all of your seams are complete. Especially make sure that the straps are well attached.


At this point, I put my CHI straightener in and pinned where I thought the separation between the two compartments should be. From there, you sew a straight stitch from the top to the bottom, reinforcing with backwards stitches especially at the opening. The other side I use for my 1" curling iron.


There you have it! A sweet tote that can be completed in less than 30 minutes and can save you precious packing time! The ties are intended to wrap up unruly cords, but if you'd like to use them to tie a bow around the opening, that would be cute too!


Sew. Sweet.

Tuesday, September 6, 2011

WHOOP!

It's finally here... Aggie Football! 
...and even the cat is excited...


Wednesday, August 31, 2011

a kitchen table update!


Here's a little kitchen table beautification project that made my dad giggle a bit... I told him about this sweet little table runner made of burlap and satin and very politely he asked me, "don't you realize those two don't go together?" 

Dad. Seriously... its called shabby chic. I got to catch him up on the times...

Anyways... you will need to first measure out your table. I have a 48" round pedastal table so I made my runner about 54" long. Of course it's up to the look that you are going for. I had a piece of burlap that was 54" by 8" wide, 1" wide satin, and scraps of stripe, lemon and chocolate printed fabric.


The next part is the best... You will make rectangles of varying lengths and about 4" wide. Sew the short ends together to make a a long strip of alternating patterns (you could of course do one long strip of a particular pattern).


Next, take your 1" piece of satin and iron in half lengthwise to create a crease.


We are now going to make the edging around the burlap in the runner. Line up the burlap and the long strip of printed fabric right side together. Place the 1" satin in the middle of the two with all the unfinished edges lined up- the folded part of the satin will be hidden under the top layer of fabric.


Here's another view... Sew along the edge, checking periodically that you are sewing through all three layers with a consistently straight seam that's about 1/4" from the unfinished edge.


Repeat for the other side... 


Now, since I felt my burlap was kinda plain just laying in the middle, I decided to add a pleat down the center. Using a tape measure, equally fold in the pleats on either side of the center of the burlap. Mine were about 1.5" from the pleat to the satin. Pin and sew along the pleat.


I then added a burlap edge to my runner using the same technique above. I cut a piece of fabric the total size of the runner and place right side together with the patchwork top of the runner. A long 1" wide piece of burlap was folded and placed in between the two layers. I pinned and sewed almost completely around the entire runner. I left a 4" hole to flip my runner right side out.


Once right side out, I checked all my seams and finished the open hole with a top stitch. I didn't end up adding the lace to the end of my runner, but I definitely could have. Also, to help the runner's edges lay flat you could sew a top stitch all the way around the runner... but it wasn't necessary for mine.

There you have it... a shabby little table runner out of burlap and satin!


Sew. Sweet.