Pages

Wednesday, August 31, 2011

a kitchen table update!


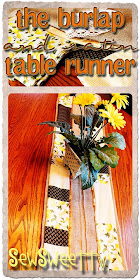
Here's a little kitchen table beautification project that made my dad giggle a bit... I told him about this sweet little table runner made of burlap and satin and very politely he asked me, "don't you realize those two don't go together?" 

Dad. Seriously... its called shabby chic. I got to catch him up on the times...

Anyways... you will need to first measure out your table. I have a 48" round pedastal table so I made my runner about 54" long. Of course it's up to the look that you are going for. I had a piece of burlap that was 54" by 8" wide, 1" wide satin, and scraps of stripe, lemon and chocolate printed fabric.


The next part is the best... You will make rectangles of varying lengths and about 4" wide. Sew the short ends together to make a a long strip of alternating patterns (you could of course do one long strip of a particular pattern).


Next, take your 1" piece of satin and iron in half lengthwise to create a crease.


We are now going to make the edging around the burlap in the runner. Line up the burlap and the long strip of printed fabric right side together. Place the 1" satin in the middle of the two with all the unfinished edges lined up- the folded part of the satin will be hidden under the top layer of fabric.


Here's another view... Sew along the edge, checking periodically that you are sewing through all three layers with a consistently straight seam that's about 1/4" from the unfinished edge.


Repeat for the other side... 


Now, since I felt my burlap was kinda plain just laying in the middle, I decided to add a pleat down the center. Using a tape measure, equally fold in the pleats on either side of the center of the burlap. Mine were about 1.5" from the pleat to the satin. Pin and sew along the pleat.


I then added a burlap edge to my runner using the same technique above. I cut a piece of fabric the total size of the runner and place right side together with the patchwork top of the runner. A long 1" wide piece of burlap was folded and placed in between the two layers. I pinned and sewed almost completely around the entire runner. I left a 4" hole to flip my runner right side out.


Once right side out, I checked all my seams and finished the open hole with a top stitch. I didn't end up adding the lace to the end of my runner, but I definitely could have. Also, to help the runner's edges lay flat you could sew a top stitch all the way around the runner... but it wasn't necessary for mine.

There you have it... a shabby little table runner out of burlap and satin!


Sew. Sweet.

Tuesday, August 30, 2011

salute to the American Indian...

I was rifling through my old scraps and ran across a little piece of Seminole Patchwork that I acquired many moons ago. It's such a fun way to make an intricate looking "quilted" pattern in a fraction of the time.  Here's a little sample to teach you...

First, cut rows of fabric (I used varying widths) and sew them together lengthwise. Then, using a rotary cutter or precise measurements, cut the strips perpendicular to the way they were originally sewn.


 Then, slide them apart at an angle with each one staggered as equally as the next.


Then pin and sew each of the new strips together to make a long row.


Iron the seams in the same direction, and now you have a new strip of fabric that can be used for just about anything... and that looks like it took hours to do!


Sew. Sweet.

Sunday, August 28, 2011

a sewing party!

A Saturday full of sewing and sweets! We invited a few friends over to practice their sewing skills and make dresses for the little ones in Africa. We made 14 dresses and ran out of time on the last 6. Just need to finish embellishments!
Sew. Sweet.

Friday, August 26, 2011

the Classic Wine Tote

Ok ladies... Time to get serious. Serious about vino.
You know you always have times when you need to bring a bottle a wine- party, wedding shower, sweet date at the park (ok, I'm a hopeless romantic).

Here's the how-to:
(Or Here is a video: Classic Wine Tote)
Start with 3 coordinating fabrics. Make two 12"x 15" pieces with a layer of cotton or polyester batting the same size. One piece of fabric will be the outside of the tote and one will be the lining. The last piece of fabric will be used for the handle and belt. You will also need a fastener (snap or button) later in the project...


Line up the three pieces with the right sides out and wrong sides sandwiching the batting. Pin in place. Then, starting at the very edge, quilt the fabric leaving about 1.5" between each  row of stitches. You can use a straight stitch, but I find that a wavy stitch is more forgiving. 

Next, fold the piece lengthwise with the lining side up. Sew a straight seam down the long side and one of the short open sides.


Take your scissors and cut away the extra fabric and strings on the edge of the seam.


Now, take one of the closed corners and pull the sides apart to make a triangle. Pin this and repeat on the other side. Try to make your triangles equal.


Sew your seam, making the bottom of the triangle.


 Cut the excess triangle off right next to the seam you just made.


Now to make the handle... You will need two pieces of coordinating fabric that are 3" x 13" long. 


For the first piece, fold in half lengthwise (right sides together) and pin. Then, make a straight seam down the long side and turn right side out. Finish the ends by tucking the unfinished edge inside the ends of the strap.  Pin and iron flat.


Sew around the entire edge of the strap.


Fold the unfinished edge at the top down about 1.5 inches and then tuck the unfinished edge under. Sew a seam around the opening of the tote. Then, center the first end of the strap on the seam and pin in place.


Secure the strap using a square pattern with a diagonal line of stitches through the middle.  The square pattern will give the handle extra security. Get creative if you'd like...


Repeat for the other end of the strap, making sure that you sew the second end exactly half way across the opening of the tote.


You could stop here, of course, as I've seen many totes this way... but here' s a way to secure the wine bottle in the tote and add a bit of charm!

Use that second 3"x13" piece of fabric and create a strap much like you did for the handle. Instead of squaring up the ends, fold them at a diagnol. Pin in place to get an idea of how it lays. Then sew all around the edges like you did previously.


 Now, you can mark where your snap will go with a fabric pencil. You could also put a functional button here if you'd like!


Mark the underside too! Attach your favorite fastener. I used a little metal snap that I hand sewed with a little faux button on top.


The last part is to secure the belt to the tote with a straight stitch. I attached my belt 2" below the opening of the tote.


There you have it... BYOWB (wine bottle)!


Sew. Sweet.

the addy skirt!

Every little girl needs plenty of skirts and plenty of ruffles!  Today's project fulfills both of these requirements and is just plain too cute for words! The Addy skirt made with the measurements in this tutorial fits my 9 month old (20 lbs.) with plenty of growing room. Now, I missed a couple of pictures along the way...So if this is a bit confusing, you can check out the video tutorial (Addy Skirt Video) to clear things up a bit. 

Start with 2 - 15"X 9" and 4-30" X 4" pieces (I used 2 different fabrics for the ruffles) of fabric.


With right sides together, sew the side seams for each of the 3 parts of your skirt; the main part (15"X 9"), ruffle 1 (the 30"X4" in the fabric different from the main part) and ruffle 2 (the 30"X4" in the fabric matching the main part).  Once you have the side seams, hem the bottom of each part of the skirt.


Next, we are going to make the ruffles by folding the top part of each ruffle down about 1/4" and sewing a running stitch all the way around. Now that you have created the ruffles with the running stitch, line up the side seam of ruffle 2 with the side seams of the main part, and sew it on about 1/4" from the bottom of the main part of the skirt.  Do the same with ruffle 1, sewing it on about an 1" above where you attached ruffle 2.


Now that you have the ruffles on, make a casing for the elastic waist band.  With the skirt inside out, fold the top about 1/4" then fold again about and 1" (more or less depending on the width of your elastic).  Sew along the top edge of the fold all the way around the skirt.  Now sew the bottom of the casing, leaving a 1" section open to feed the elastic through.  Use a safety pin to feed your elastic through the waist band casing, and sew up the 1" section that you left open.


And Ta-Da!  Your simple, sweet, ruffley Addy Skirt!


Sew Sweet! 

Thursday, August 18, 2011

Movie Night = Cupcakes!

Who says movie night isn't delicious? We think it should be! A group of us got together and I wanted to celebrate this seemingly ordinary hang out with some fun themed cupcakes! My inspiration came from the wonderful book, "Hello, Cupcake!" and I recommend to all...


A how to is in order... but I definitely recommend buying the book because it's full of all kinds of fun cupcakes! AND there's a sequel too. "What's New, Cupcake"

Here's my version (all credit given to "Hello Cupcake!"):

You will need clean kitchen scissors, cake mix, buttercream icing, white mini marshmellows and multicolored "FunMallows." Divide out all of the yellow marshmellows.


Make your cake mix as directed (I like to substitute apple sauce 1:1 for oil to make a little healthier), and pour into red baking cups (I tried to find red & white stripes, but had to order them online).


 Then, take clean kitchen scissors and cut the marshmellow into thirds. I liked to leave just a small bit of marshmellow attaching each of the pieces. I used up all of my yellow marshmellows and started working on my white marshmellows.


Take a whole marshmellow and put a small dab of royal icing on one of the flat edges. (royal icing is basically powdered sugar and milk made to a thick consistency). Then place the marshmellow directly on the center of the marshmellow cut in three.


I ended up making almost 100 little marshmellow popcorns!


Ice your cupcake with buttercream (gives it a slight yellow tint) and hot glue on your popcorn sign that you cut out with your printer. 


Add your popcorn pieces... I used about 6-8 pieces per cupcake, about half white and half yellow marshmellow popcorns to cover the top.


Enjoy!!!

Sew.Sweet.